X-Plane 10 / Cessna 172
Instruments and navigation basics
From beginner to beginner
This page is for you if you allready know your way around this simulator, can get the plane up, keep it there and toss it around the sky.
This page is not for you if you know more or less than described above.
In the 80's I spent hours and hours with my C64 playing Solo Flight II (flying mail with a small a Cessna or equivalent) and F-19 Project Stealth
Fighter, but after those years I haven't found any simulator that would keep me interested more than a few moments. Until now. Just recently I saw
an article about X-Plane 10 and decided to try it. When I'm writing this, it's 6am and I've been flying all night long so I think I've found it.
I know a default Cessna 172 isn't the wow-gasp-omg -plane to begin with, but that's the one I've been flying and the reason is that I guess it's the
'category' every gonna-be-a-pilot has to start with.
Anyone who's gonna try this simulator propably knows the basics (=how to get it up and keep it there) so I'll skip that here,
instead I'll be showing some simple - yet not obvious - stuff I had to look for from the forums, youtube etc to understand and to be able
to fly more than just to enjoy the eyecandy.
Note! Most likely everything here isn't 100% right, but with this 'knowledge' I can fly manually and with autopilot, navigate where I want to go
and even do a instrument landing (no described here yet) so should be close enough for beginners.
Vne = Never exeed speed
There is a setting in X-Plane to select if the plane suffers damage while overspeeding or not.
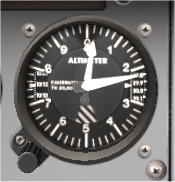
The altimeter shows height from the sealevel and uses air pressure to measure it. As the air pressure (~weather) changes, the altimeter has to be calibrated.
The easiest way is to check the altude of the airport/runway you're starting from and adjusting the meter to show the right reading.
Adjustment is done by the knob located next to the altimeter.
Another way to adjust it correctly, is to see the map and check the altimeter setting of the nearest airports. When you click on an airport, you'll get an 'info box' in the
upper right corner on the map and there will be the altimeter setting too. It may be for example 3006 and the you just adjust the small scale in the right side of the altimeter
to that reading. The numbers on the scale are 30.0 (=3000) and 30.1 (=3010) so you'll have to set it somewhere between to what you think is closest to 3006.
On a long journey the weather (~air pressure) will change and the altimeter will start showing wrong numbers and you will have to recalbrate it, and in the air you can of course
use only the second method.
And one thing about the altimeter that wasn't clear to me before I looked into it. The stripes above the number 5. They are visible only at altitudes below 10000, when you
go over that, they will disappear. So when they are visible, you are on the last 10000 before hitting the ground. With a Cessna you propably don't go over 10k very often so they will
be visible about all the time.
I haven't looked into this at all, this is just something I've figured out myself so it may be wrong. At least I've found the places
I've been trying to navigate to so should be quite okay.
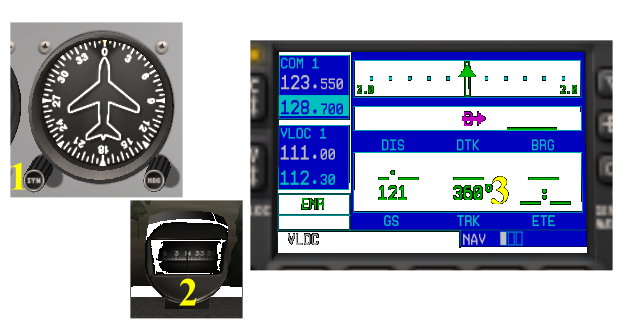
The gyro compass can be calibrated with the knob 1. To know the real direction you are going, you can use the compass on the dashboard (2) or the
GPS (3). The compass on the dashboard works also when not moving, but as it's not as easy to read than the GPS I recommend using the GPS.
As you have to fly straight to get constant reading from the GPS, it's easiest to activate the autopilot to do the job.
Just get the autopilot to fly to direction X and see that the GPS shows the same direction. If not, adjust the compass.
NOTE! About any kind of wind will ruin the calibration methods above as the plane will be going more or less to some other direction
than where the nose is pointing! Calibrate it with no winds and don't touch it ever again, see what happens. I've been flying only in
the same area (Southern Finland) all the time and I've been fine after calibrating it once.
You really should have a joystick, keyboard and/or mouse work but .. It doesn't have to be state of the art with many knobs and stuff,
a basic joystick with yaw control (usually by twisting the handle) will do just fine. A yoke will be even better, at least I've found it much better because it's
quite a bit easier to adjust pitch or roll without effecting the other. With a joystick I feel that everytime I try to fine-adjust one thing, the other thing gets
also some input and strange things happen.
You will need the yaw control (=rudder and front wheel) as it's the only way to turn on the ground, and I've read somewhere that there is no
option to use keys/mouse for that. That may be false information but I haven't checked that because my joystick has that function.
It's also needed for crosswinds but we beginners fly only in nice weather, don't we :-)
Update to previous. From X-Plane 10.30 the yaw control isn't 100% necessary, the plane can be controlled on the ground with a 'yawless' joystick or rudder pedals.
But as the joystick/yoke controls also the ailerons at the same time, you will easily flip the plane on the ground at higher speeds (=taking off and landing).
Also you can't use the rudder in-flight as it should be used, so you really should have something to control the rudder.
When you get the plane up, you'll propably notice that it's not that simple to get it to fly straight and level. By gentle touch it may be
mastered, but still you will have to hold the stick to some direction to get a straight flight. That's where you need the trim. Go to the settings
and assign keys or joy buttons at least for aileron (=turning) trim left/right and elevator (=up/down) trim up/down.
There are also settings for both of them
for landing (or was it takeoff?), I guess that's something like 'center' so make it available too. Now, when you're flying and the plane needs slight
constant push to some direction, use the trims to get it going straight.
Achieving a steady flight can be a pain in somewhere, but it can be done - or so I've heard.
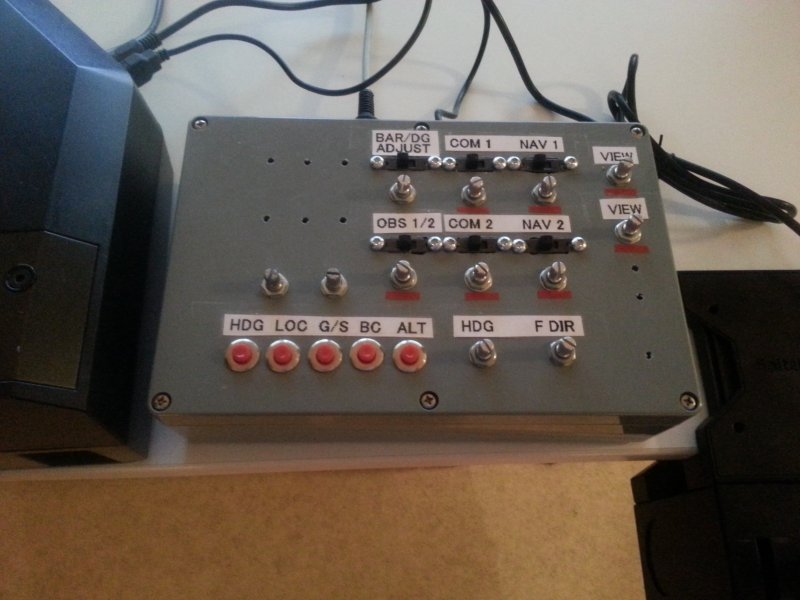
1) Use this knob to adjust the heading.
The altitude setting can not be pre-adjusted but you can adjust the heading while still on the ground so you have one thing less to do when airborne.
When you are at the correct altitude, activate the autopilot:
3) Push HDG to activate the heading and ALT to mark the current altitude.
The autopilot is flying the plane only when it's on AUTO -position. For us beginners, the ON position is about the same than OFF eventough there is an idea
behing the ON setting.
If you click the HDG (heading) button while autopilot is flying, the autopilot will hold the altitude but you can turn the plane. Once you press it again,
it will activate and start flying to the direction adjusted in the compass. You can click also the ALT button (it will turn from green to yellow) but I
don't understand the function of that, the autopilot still seems to fight back if you try change altitude.
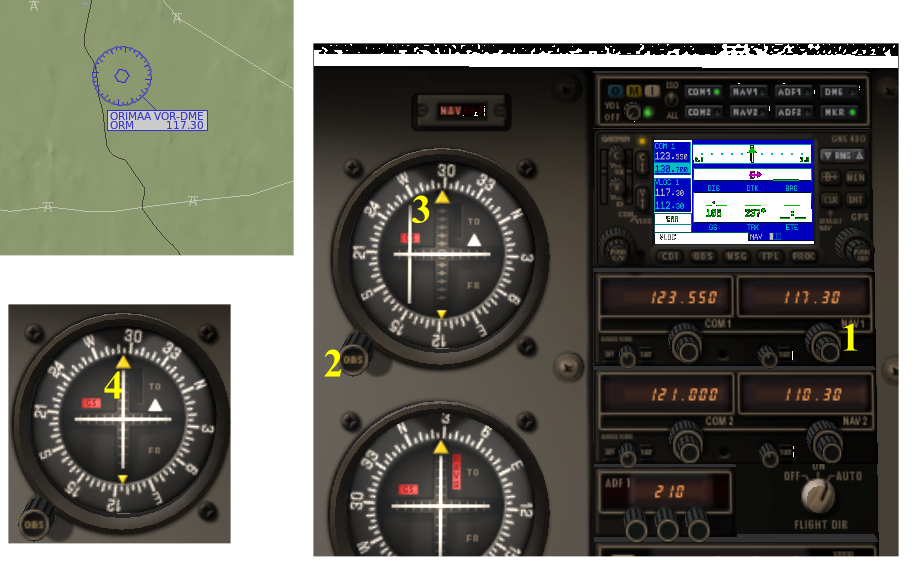
On the map you can see some navigation stations (that's propably not the correct word but we beginners don't care) which can used for - tadaa! - navigation!
Adjust the frequency of NAV1 (freq can be seen in the map) with knob 1. Rotate knob 2 until the horizontal line 3 starts to move. Ajust so that the line is in
the center (4) and now you have the direction to the VOR. About 294 in this case. The white triangle next to the line tells if you're going towards the
VOR or away from it. NAV2 works ofcourse the same way.
In bad weather - or if you are lazy - it's easiest to let the automatics take care of finding the airport, and this is one way to do it:
Check that you are in NAV mode (1), if you have been using GPS this may have been left to gps position.
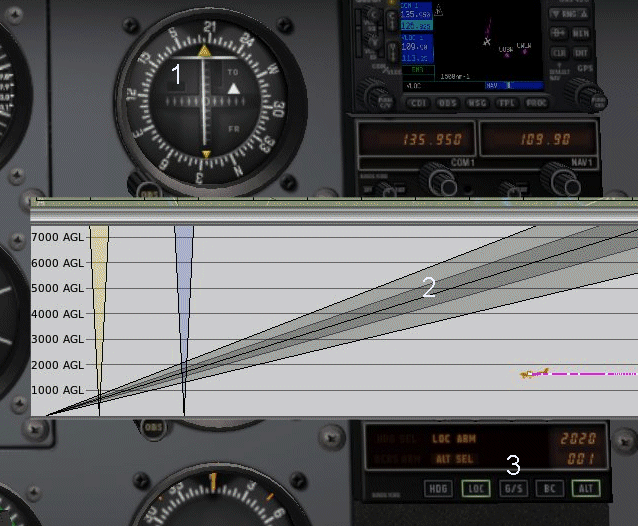
When you reach certain angle related to the runway (I think it's 30deg), the localizer wakes up (1), disengages the HDG function of the autopilot and activates pre-armed LOC (2)
and starts to guide the autopilot.
After a while, the glidescope activates too (1).
As you get closer to the airport, you also get closer to the glideslope and the istruments (1) will show that.
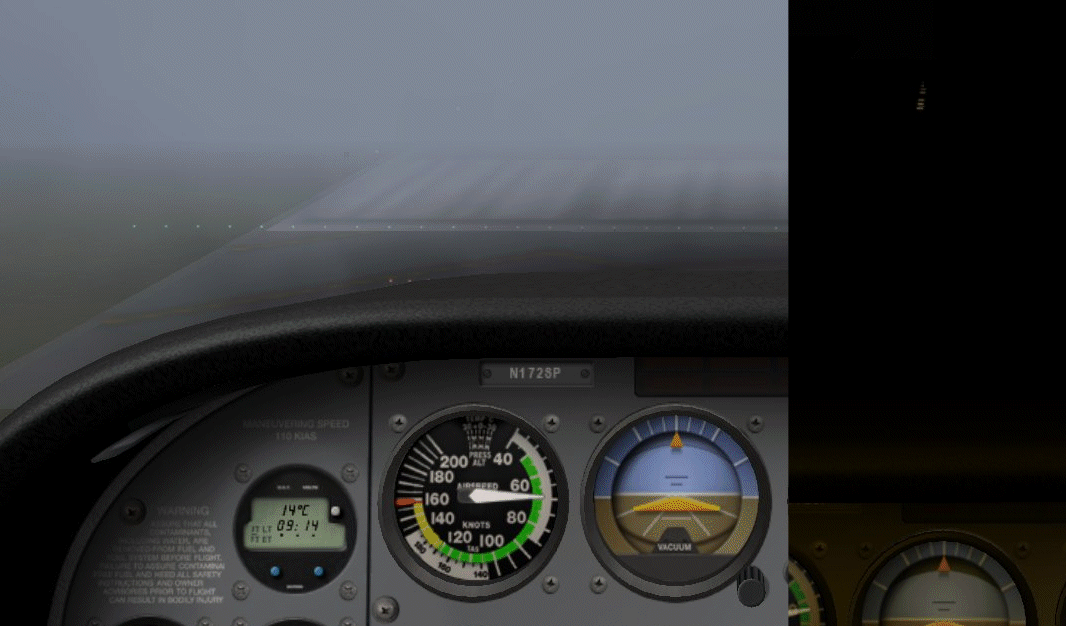
And before you know it, you'll find the runway even at night and/or bad visibility!
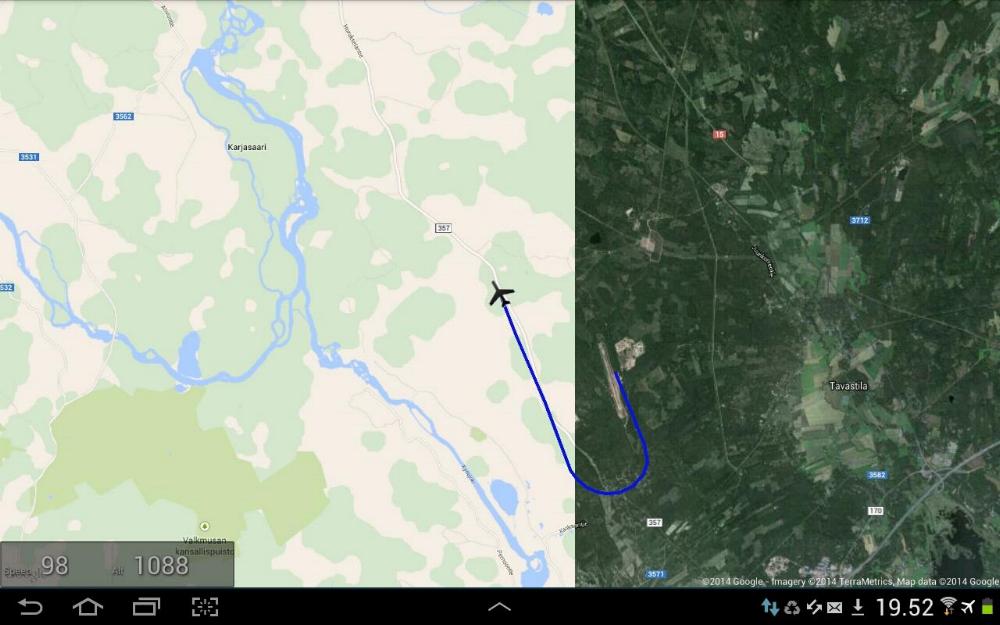
Monitor your flight on a map with an Android device. At this time the price seems to be 0,80e and there are a lot cheaper (=free) programs for this same use but I've found this
to be easiest to set up.
I recently replaced my old (and sluggish) Logitech joystick with a complete Saitek system, the Proflight yoke+throttlequadrant and the pedals. And it's propably not a surprise to anyone,
but the feeling is something else than before. First 20 minutes with the yoke were a bit frustrating, I thought I'll never get used to it but after half an hour and a few landing
excercises, I won't miss the joystick. But the pedals. I think it's gonna take some time to get used to them, bu we'll see.
And now I guess you are wondering, wtf is that next to the yoke :-D
The heart of the thing is the famous BU0836X. As it wasn't enough for my plans but the price is what it is, I gambled and
bought a very cheap (I think it was under 10 euros incl p&p, the BU was around 70 euros) universal usb joystick controller from Ebay.
There is also a Koning usb hub inside.
It has now 10 rotary encoder switches from which 7 have a push button function too.
6 of them can be doubled with the selector switch (I didn't want to use 15-20 euro/piecec for dual rotaries). There are also 5 buttons and two potentiometers. The potentiometers don't work as there
was a mistake made in the wiring, but as I don't really know any use for those at the moment, I haven't fixed them. Also there are no knobs for the switches yet. Also the selector switches could've
been installed in a nicer way but fortunately this ended up bei'ng a prototype anyway :-)
As you can see, it's currently set up mostly for navigation and autopilot use but can be set up to do anything from the X-Plane settings.
I actually bought two of those cheaper usb controllers and was going to add more functions but as the work progressed it became obvious that fitting one more controller and 24 more wires to this box
would be asking for trouble so it ended up be'ing like this.
There are over 90 soldered connections and over 90 wires, and yet there were about 5 wires falsely connected :-)
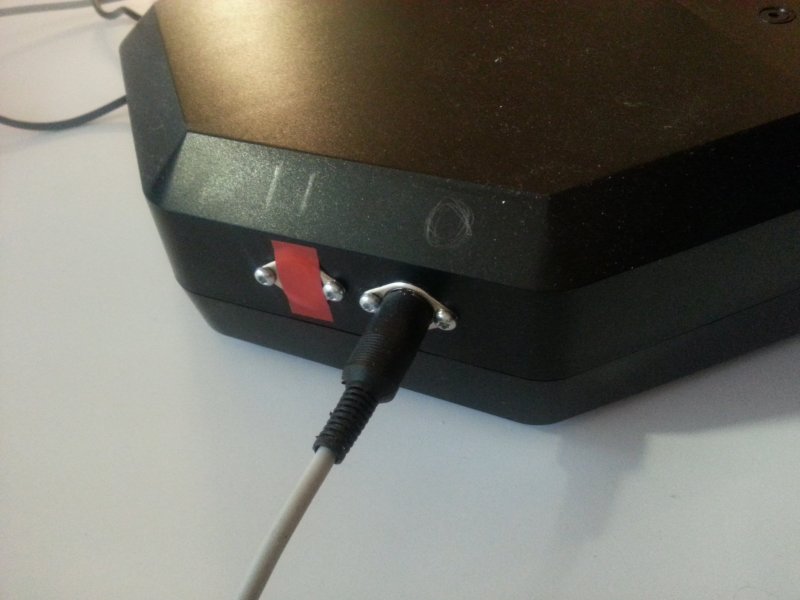
And there is one feature more. A connector for a cable that goes to the yoke.
There is a well known problem with the Saitek Pro Flight Yoke and this cable resolves that. There is a terrible dead zone
programmed into the yoke (!!) which can be fixed only by wiring the yoke's potentiometers to another controller. So, this cable connects the potentiometers to the BU0386X which
is in the box. If I for some reason need to use the yoke without my 'pilot box', there is the other connector as a 'loop in' and that way I can wire the pots to the original electronics.
I know there would've been finer solutions than use an old 5 pin DIN - or even two - connector, but this was what I had available at that time.
Eventhough I this look like s**t, I have been very happy with it. With the exception of looks, it has been at least as good as I was hoping for. Now that I know what to do differently and what
functions I need to add, the next one will be bigger, better and more professional looking!
Update 2017! There is now a page about that box and a new version on its way, click here.
Speedometer
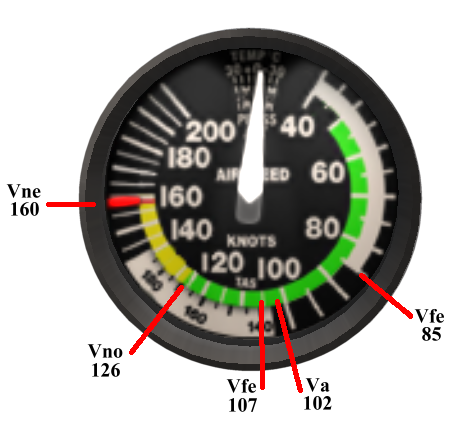
Vno = Maximum strutural cruising speed
Vfe (107) = Maximum speed flaps 10 degrees
Va = Maneuvering speed, no full or abrupt control movements above this speed
Vfe (85) = Maximum speed flaps 10-30 degrees
Calibrating the instruments
Steady manual flight
The autopilot
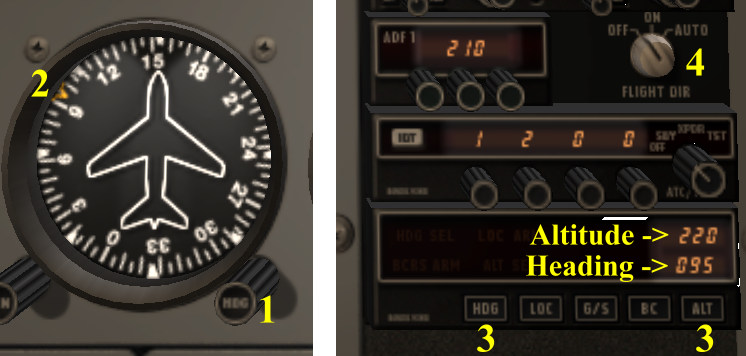
2) The orange bug moves as you adjust.
4) Turn the knob to auto and the plane will fly to the adjusted direction at current altitude.
VOR navigation
ILS (Instrument Landing System) without GPS

Adjust (2) nav 1 to the correct ILS frequency.
Approach the airport at sensible distance and angle (3, the line before the turn). This demonstration is made with autopilot so at this time it's controlling heading and altitude (4)
and the localizer (5) is armed (yellow).
You could also arm the glideslope (6) but I'll leave it off at this time and will explain this later.
The red markings 7 and 8 mean that there is no 'contact' for localizer and glidescope.
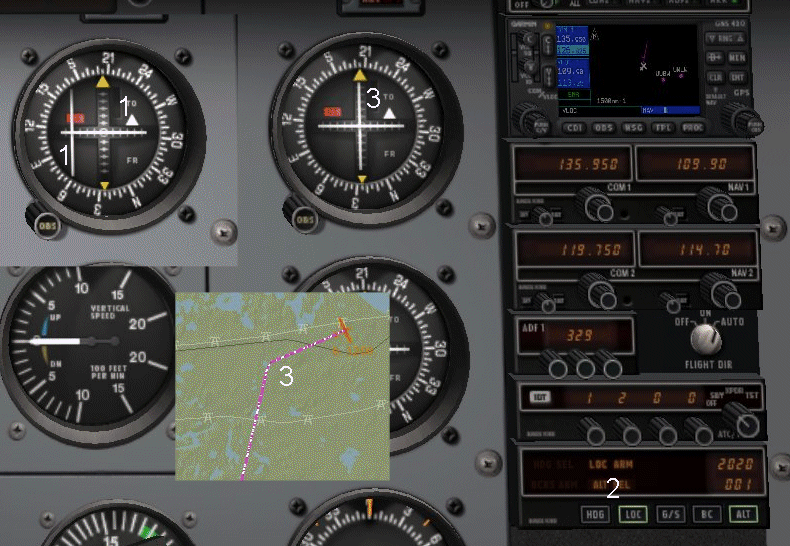
When it's time, it turns the plane towards the runway (3)
As you can see from the glideslope bar, the plane should be a lot higher, and the picture (2) shows that too. And this is now the reason why I didn't arm the GS function (3) in the autopilot
earlier. If it had been armed (yellow) too, the autopilot would climb the plane now and that is obviously useless in this situation. Of course I should be higher at that point anyway, but this is
just to show. If you happend to be too high when the 'glideslope kicks in', you can/should activate the GS right away so the autopilot decends you to proper altitude.
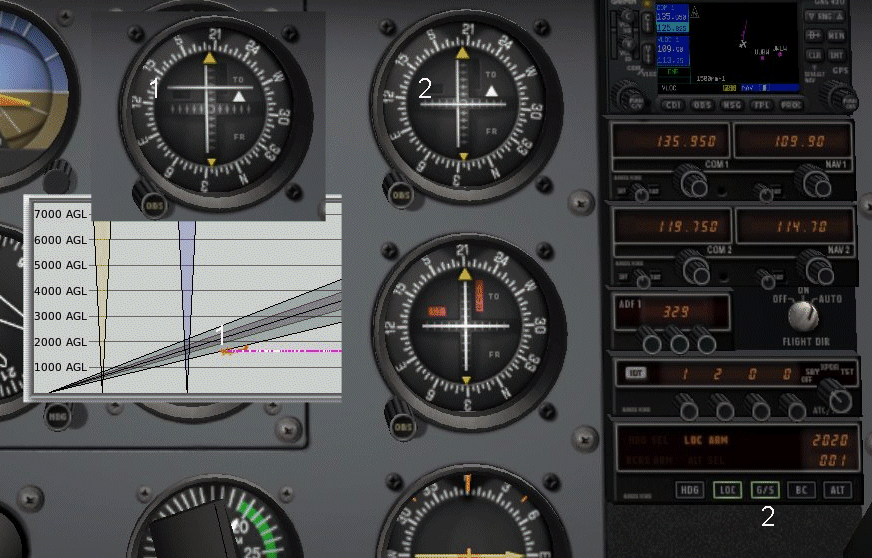
When the glideslope indicator tells you are in the middle of it, activate GS in the autopilot (2) and now we have ILS and autopilot flying towards the runway and descending the glideslope.
NOTE! You still have to control the flaps and airspeed manually!
When you have the runway in sight, you should disconnect the autopilot and take care of the rest by yourself as the autopilot isn't capable of doing it properly all the way.
This whole ILS can be done also by manual flight if you just keep an eye on the LOC/GS indicators. Tried it a few times but following the localizer is a bit too hard for me.
X.Map for X-Plane Android

Eventough the Saitek set has a few buttons and stuff to use for what ever, there were still a lot to control with the mouse and/or the
keyboard. Having the keyboard on my left side and the mouse on top of the yoke box, things weren't as easy as I would've liked so I ended up with my 'Pilot box v0.00000000001b'.